Day 7
Game Audio
It’s the final day!
And today, we focus on audio.
Audio is a very easily overlooked component of games. Especially subtle sound effects
enhance the way we feel about an action in a game greatly. And we often don’t even notice
they’re there.
Music, of course, can often be a very prominent part of the experience. So, we’ll be looking
at how to make a fun little tune for our game.
Software
Again, we need software to make audio. I suggest you get a trial version of Reaper. It’s a fully functional digital audio workstation and easily beats any free software out there. Later, if you feel like the full license might interest you, it’s only $60. If you absolutely want to use something free, you could get Audacity, but you won’t be able to follow along with this guide and the tools will be severely limited. Get Reaper trial version here. When you get Reaper installed, open it up. It will tell you to select an audio system before you can use it. WaveOut works just fine. There are many different types of music, like orchestral music, solo piano, a cappella, polka, and the always delightful free jazz. I think the most useful way to start is by examining the structure of basic pop/rock track. There are four basic elements. 1. Beat Often played with drums. Roots the music and gives it a rhythmic feel. 2. Bass Played with a e.g. bass guitar, synth bass, cello. Makes the track sound deeper. 3. Harmony Gives the song structure and fills out the empty sonic space. 4. Melody Carries a song. Could be performed by a vocalist, lead guitar, violin, or many other instruments. We’re going to tackle all of these one by one. But first a word about music theory. If you don’t know anything about music theory, it’s going to feel like a lot. Let’s go over a few basic things that will help you to conceptualize your way around. Caution: I’m going to simplify things a lot to help out everyone with no previous music background.Music Theory (Scales)
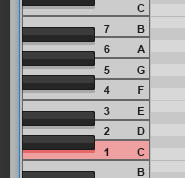
Have you ever seen piano keys? Did you ever note how there’s a patter that seems to repeat? That’s because it does. The white keys of a piano are called A, B, C, D, E, F, and G. And after a G you get another A. Just on a higher octave. A group of notes like that is also known as a scale. There are two basic scales that both follow only the white keys on the piano. I thought it would make our lives easier if we just focused on one of those. The other scale starts with A and is called A minor. The other one starts with C and is called C major. If you play the notes of either scale one by one you can get a sense of how a minor scale sounds and how a major scale sounds like. Typically, they’re characterized as minor being melancholic and major being more upbeat, but those are just words trying to describe sound. Why is any of this important? If we stick to one scale, it’s relatively easy to create something that sounds pleasant. So, if we use chords that only have notes from the C major scale and a melody that only has notes from C major scale, they’re going to fit together pretty well. Let’s use C major today.Music Theory (Rhythm)
Music is arranged into measures. Each measure has a set number of beats. For an example, in waltz each measure has three beats while in rock music each measure typically has four beats. You can put music on, tap your feet, and start counting the number of beats. When you notice the drums repeating a pattern, you’ll soon catch on to how many beats each measure has. The tempo of a track is typically stated as BPM or beats per minute. This means that a regular 120 BPM track has two beats every second.Beat Track
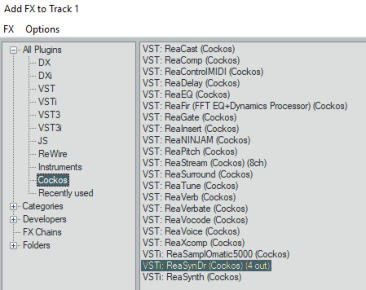
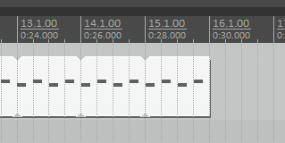
First, we need to create a new track inside Reaper. This happens by double clicking the empty section at the left side of the screen. Next, press the FX button on the track to add a plug-in. If the Add FX window doesn’t open automatically, press the Add button at the bottom of the FX window. Then, head to the Cockos folder and select ReaSynDr. This one is a basic drum machine. Press Ok and close the FX window. We’re going to use MIDI to tell the drum machine what to play. MIDI is a way to write notes so that synthesizers like ReaSynDr can read them and output sound based on the parameters. Go to the Insert menu and select New MIDI Item. This will add a MIDI block on the track that we created. Double-click that MIDI Item. This will take you to a MIDI editor where you can place down notes. You should be able to see a few instructions on the piano roll on the left side of the editor. We want to create a simple beat by placing kicks on beats 1 and 3 and snare hits on beats 2 and 4. You can add notes by double clicking the grid. If you make a mistake, holding Alt turns the cursor into an eraser. You can also move the notes by dragging them around. See if you can do something similar to this… Don’t worry too much about where these notes are vertically. They sound the same in each octave. Just make sure that the notes in the piano roll says Kick and Snare. This is our beat. Simple, to be sure. But it’ll work for now. Close the MIDI editor. Next, I want you to place your cursor at the right edge of the MIDI item and drag it out. This will expand the beat so that we can have a longer track. Use the mouse wheel to zoom out until you can see the 30 second mark on the track. Then drag the beat until it’s 30 seconds long.Bass Track
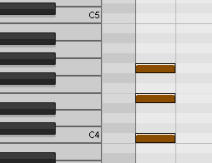
Create a new track and this time place a ReaSynth FX plug-in on it. Also, make a new MIDI item and double-click to go inside it. This time I want to make the MIDI item longer so I can place more stuff inside it. Drag the edge of the MIDI item inside the MIDI editor until it’s four measures long. Then, you’ll see a thick, gray line at the border of each measure. It points out where the item starts repeating. Grab the one that’s located at the beginning of second measure and drag it at the end of the measure. You should be looking at something like this… The point of a bass is to ground the track and give it some of that OOMPF. So, we want the notes to be relatively low. Bass is also one of those instruments that works better when it does a very basic pattern. It’s supposed to lay a foundation for the other instruments, not to be a solo instrument. Let’s start at C2, then go to F and finally G. Here’s what I’ve got… Now, we’ve got an 8-second bass loop. And of course, if we drag the MIDI item out like the beat track, we’ll notice that 8 times 4 is 32 and not 30. I want the loop to be completed four times, so let’s drag both the beat and the bass track up to 32 seconds.Harmony Track
This track is going to be very similar to the bass track so we can just duplicate that one. Click the bass track at the left panel with second mouse button and select “Duplicate tracks”. Now, we could just delete the MIDI item in the harmony track, but we need a MIDI item, so let’s just use this one. So, instead, open up the MIDI item, go to Edit menu and click Select all, then Edit and Delete. I want to create a harmony track that will accompany the melody with chords. What are chords? They’re multiple notes played at the same time. I’m going to tell you about something called triad chords. Triad chords are very simple. You take your scale. Then, you pick a note that will be the chord’s root note. You then skip the next note on the scale and go up to the third one. Then skip another note and go to the fifth one. This is your triad chord. Let’s do a similar pattern to the bass track with the chords. First, two measures of C chords, then F chords, and finally G chords. However, let’s change the note lengths a bit. When you’ve got the first chord done, select them all by drawing a box around them with the second mouse button. Drag the ends of the notes outward until they are three times as long. Then copy the notes, move the cursor to the third beat and paste. Repeat until you’ve got two measures. After that, make the F chord and G chord to match the first two measures.Melody Track
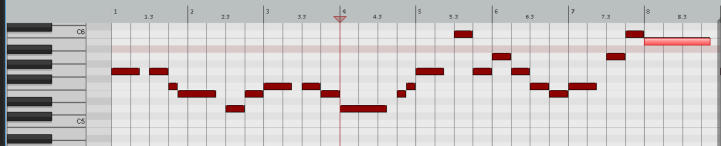
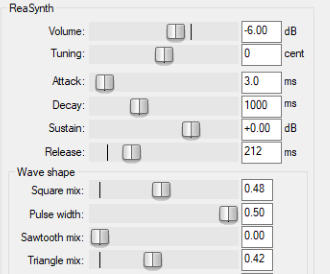
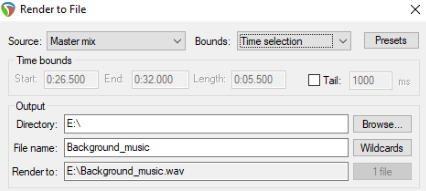
Finally, let’s create a melody for the track. The ideal way to make a melody for me is to play the track I’ve got ready. Then, I’ll try to listen to what is playing in my head. Once I’ve got something good, I try to find the notes on the piano and write them down. However, that can be a bit tough unless you practice it. I’d say go on and experiment. Use the white keys, use longer and shorter notes, try to find a motif that sounds nice when repeated. I suggest you only use notes above C5. That way they don’t get muddled down by the rhythm track. Here’s what I did… Here’s a fun tip. If you go back to the FX of any of the ReaSynth tracks, you can alter the sound of the instrument by fiddling around with the settings. Especially the Wave shape settings can have drastic changes. If you change the attack and release values, you can make the notes sound less snappy. They’ll create a neat pad effect. Note that you can change the settings as the track is playing. Finally, try to mix the whole track by changing the volume levels. The important thing is that the master track doesn’t go to red. If it does, you need to lower the volume. Then click the bright red rectangle on the Master track to zero it out and try again. When you’re not in the red anymore, try to set the volume levels of each four tracks so that you can hear every track clearly and that nothing is completely over-powering. (If you can’t see the Mixer, go to View menu and select Mixer.) Then, drag around the numbers bar on the top to create a selection. Select the whole track, then go to File menu and select Render. Here, it’s important that you set the Bounds to Time selection and set the output directory and file name. We’re going to render the track as WAV, so the rest of the settings are fine. Click the button that says “Render 1 file” and just sit back. (Note: You can find a ton of free VST plug-in instruments via Google if you wish to experiment with different sounds.)Hooking Up The Music
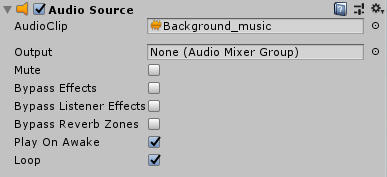
When you’ve got the WAV file on your drive, go to Unity and import it to your project. After that, select your GameMode object and add a component to it called Audio Source. On the component, locate the AudioClip field and click the little circle next to it. Select your background music. Don’t forget to check the Loop checkbox so that the music will repeat when it gets to the end of the track. That’s it. Now you’ve got music in your game.Final Words
If you want to make a version of the game that you can share to your friends, go to File menu and select Build And Run. Then select a folder where you want the executable to be compiled. And that’s the seven-day guide! You probably noticed that some topics ran a bit long and that we skipped a lot of stuff. That’s because creating even the tiniest game is a massive undertaking and covering the whole thing is more that can be fit in a seven-day course. But you got your feet wet with a whole bunch of different topics. What else could you do to further develop this project? 1. Make the hoops come out at different heights. 2. Make sound effects 3. Tweak the gameplay so that the game feels better to play 4. Tweak the controls to be more responsive 5. Create a main menu with simple options for sound etc. 6. Make a restart button for the Game Over screen 7. Create particle effects 8. High score list that gets saved on the device 9. Install Android Studio and build a mobile version of the game The most important skill of a game developer is to know how to use Google. You have to dig out the information you need. And that’s how you improve. Congratulations for finishing this crash course. Good luck with your future game development endeavors!
If you have feedback or questions drop a note
on Twitter.