Day 4
Mechanics
Today, we’ll get deeper into C# programming.
C# Variables
A key part of programming is using the memory of the computer by putting stuff in it and taking stuff out of it. In C# we can use variables to do this. Variables are containers that can hold information of a specific type. For an example, one type of variable might be able to hold pictures while another type of variable might hold audio. There are many types of variables. Some are specific to Unity and some to the C# programming language. Here are some examples of variables: • float jumpForce • Rigidbody2D rb • Vector2 velocity The first one is a variable called jumpForce that can hold a floating-point number (e.g. 77.5454). The second one is a variable called rb that can hold a Rigidbody2D, which is a Unity component that we used on our player character to get him to fall down. The third one is a variable called velocity that can hold a vector of two elements. In this case it’s x and y for vertical and horizontal velocity. It is very common that variables, like velocity above, can have a number of different elements. The elements are often called members. These members can be other variables or methods. So, in the case of velocity, you can think of it as a collection of two other variables, float x and float y. That’s how you define a variable, but the point of a variable is that it contains data that can vary. You put data inside a variable like this… Remember that you can only use data that is the same type as the variable. In the example above the f is a unique way to tell the computer that the number is a floating-point value. Now the value 10 is inside the variable and you can use it normally in calculations. For an example jumpForce+jumpForce would give us 20, while jumpForce*5 would be 50.Jumping
The best way to learn is by doing. So, let’s start by opening up the JumpScript and defining the variables I introduced earlier. You can put them at the top of the class block like this… Jumping in real world is an action where the velocity of an object pushes it upwards. Luckily, the Rigidbody2D component of the player already has velocity that we can manipulate. Currently, the velocity is affected only by gravity that keeps pulling the object downwards. We want the screen tap to introduce different velocity. So the plan is this. We’ll define an abstract jump force value, such as 10. We then make our own velocity variable and change its y member to equal the jump force value. And finally, we grab the Rigidbody2D component of the player and change its velocity member to equal our newly created velocity member. Of course, the gravity is immediately going to start decreasing the y member of the velocity, but every time the player taps the screen, the new velocity is going to pop them upwards again. Next, we need to initialize the variables with some values. This is something we only need to do once, so we can use the Start method. In fact, the comment (the line starting with //) above it already says “Use this for initialization”. Who are we to argue, right? Each of our three variables needs a value or we can’t really use them for anything. The first line with jumpForce we explained already, but about the second line? I don’t want you to get too bogged down by the syntax, because these things are really out of scope for this guide. You’re just going to have to accept that you can use things even if you don’t exactly understand how they work, yet. The gist of it is that we are accessing the gameObject that has this script on it and we want to get that object’s Rigidbody2D component. Finally, we put that Rigidbody2D component to the rb variable that we defined earlier. You can probably figure out the third line, but if you can’t, here it is. Now that the Rigidbody2D component is in the rb variable, we can access its velocity member. So, we do just that and put it to the velocity variable we defined earlier. Cool. Now we have a bunch of variables hot and loaded. The only thing left is to do something meaningful with them. Let’s go to the JumpClick method since that is what’s getting executed when the player taps the screen. We’ve set up everything so neatly that we only need two lines to get the player character jumping. First, change the y member of our velocity variably to equal the jumpForce value. And second, make the velocity of the Rigidbody2D equal our velocity variable. Note: You could technically trim the line count by quite a bit, but I wanted to keep all the different steps as clear as possible. Now you can go back to Unity and play the game. Clicking the screen should result in the player character shooting upwards.Level Scrolling
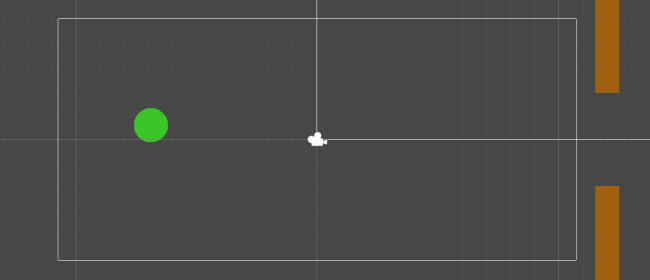
The level scrolling is handled by… 1. Creating obstacles off-screen 2. Moving them from right to left The player character never moves horizontally at all. We just create an illusion of movement by moving everything else on the screen. We also need to create an invisible score zone in-between the upper and lower parts of every obstacle. That way, when the player character hits the score zone, we can increase the total score by one. First, create an empty object by going to the GameObject menu and selecting Create Empty. After that, take the two rectangles already in the Scene and put them inside the empty GameObject by dragging and dropping them inside the Hierarchy tab. This creates a neat little group out of the objects. Perhaps we should also rename the GameObject in the Inspector to something like HoopObstacle. Also, it’s not a bad idea to center the rectangles. Set both of their X positions to 0 and Y positions to something like 6 for the top and -6 for the bottom. The closer together they are, the harder the game is going to be. To make the obstacles move from right to left we need another script. First, select the HoopObstacle that’s located in the Scene and move it right until it’s off the screen. The x position should be around 12. After that, press the Add Component button in the Inspector and type in “new”. Unity will offer you New Script as a result. Press enter, type in a name for the script e.g. Movement, and press enter again. This will add the component. After that, double-click the grayed-out Script text field that says Movement. This opens up the script in Visual Studio. This time we will be using the Update method inside the script. There’s a comment (the line starting with //) inside it that gives us a hint at what the purpose of the method is. This specific method is executed multiple times every second. So, whatever we put inside it will get repeated over and over. This is very useful because we actually want to do something every second over and over. And that is to move the obstacles a little bit to the right. This line accomplishes multiple things. 1. It gets the HoopObstacle’s position by accessing the transform component of this gameObject. 2. Since I know that a position is a Vector3 (for x, y, and z values), I can create a new Vector3 with a slightly negative x value. 3. The new Vector3 gets added to the current position of the HoopObstacle by using the += operator. Since Update is called once per frame, the HoopObstacle’s x position is decreased over and over. If you now play the game, you’ll notice that the obstacle you placed off-screen is slowly moving towards the player character.More Obstacles
I don’t know about you, but I want to keep the action going. That means more obstacles! Let’s first create another Empty object. When you’ve got one in the scene, rename it to something like GameMode. This is going to be a manager object, which handles general stuff behind the scenes. Make a new script for the GameMode object. You can call it something like “ObstacleSpawner”. Again, let’s start by defining and initializing a few variables. As you can see, some variables can be defined and initialized on the same line. That makes things more compact. We can’t be spawning obstacles every frame. Otherwise, the screen would be absolutely flooded with them. Instead, we’ll create a system that only spawns an obstacle every three seconds. That’s why we need the nextActionTime and period variables. In the Start method we use GameObject.Find to grab the HoopObstacle we created. We have to tell the code to go and find a GameObject called HoopObstacle inside Unity because otherwise the code doesn’t know what you’re referring to. C# is its own contained ecosystem so we need to have little helpers like GameObject.Find to go grab stuff for us inside the game engine. Once the HoopObstacle object is found, we place it inside a GameObject variable called obstacle. Additionally, we set the starting position for the obstacles to be 12 in x axis because we know that will be off-screen. This is where the fun starts. Inside the Update method we use an if statement. The code inside the if statement block gets executed only if the condition in the parentheses is fulfilled. Otherwise it’s jumped over. Here the condition is Time.time > nextActionTime. We know that nextActionTime is 3.0 but what is Time.time? It’s the time in seconds that has passed since the start of the game. The condition states that Time.time must be larger than nextActionTime, which is 3.0. If we go inside the if statement block we can see that we’re merely instantiating (or spawning) an object. You tell the Instantiate command which object you want to instantiate, what is the location where you want it to be instantiated in, and what is the rotation. The next line is the key to our spawning plot. We add period to nextActionTime, which makes it 6.0. This means that we won’t go inside the if block until Time.time is bigger than 6.0. When that happens, we’ll instantiate another obstacle and period gets added to nextActionTime, which now makes it 9.0. And after that 12.0, and so on. Note: We don’t want to spawn an obstacle right at the beginning because we already have one obstacle in the scene. If you run the game now, you’ll notice that the obstacles just keep on coming.Collisions
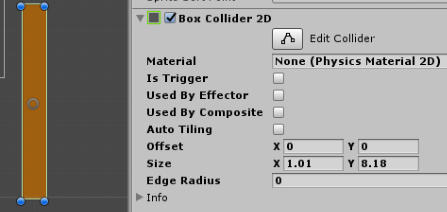
One last thing (I feel like Columbo). Let’s add collisions to the game. Like the name suggests, this will make the objects collide into each other. We need colliders for the player and the two rectangles in the HoopObstacle. So, select the player object and add a component for it called Circle Collider 2D. Next, you need to individually add a Box Collider 2D for each rectangle in the HoopObstacle object. If you test the game now, you can see the player colliding with the obstacles. An interesting variation to Flappy Bird would be that you don’t immediately lose the game if you hit an obstacle. Instead, you only lose if you get pushed off the screen. Maybe we’ll keep it classic, though. Good job! You made it to the end of today’s lesson. I know it was a long one. But you did it! See you tomorrow.
public class JumpScript : MonoBehaviour {
float jumpForce;
Rigidbody2D rb;
Vector2 velocity;
...
jumpForce = 10f;
// Use this for initialization
void Start () {
jumpForce = 10f;
rb = gameObject.GetComponent<Rigidbody2D>();
velocity = rb.velocity;
}
public void JumpClick () {
velocity.y = jumpForce;
rb.velocity = velocity;
}
public class ObstacleSpawner : MonoBehaviour {
float nextActionTime = 3.0f;
float period = 3.0f;
GameObject obstacle;
Vector2 startPos;
// Use this for initialization
void Start () {
obstacle = GameObject.Find("HoopObstacle");
startPos.x = 12;
}
...
void Update () {
gameObject.transform.position += new Vector3(-0.1f, 0, 0);
}
void Update () {
if (Time.time > nextActionTime)
{
Instantiate(obstacle, startPos, Quaternion.identity);
nextActionTime += period;
}
}

If you have feedback or questions drop a note
on Twitter.